Photography Tips for Newbies: White Balance and Metering
This week, we’re discussing metering and white balance.
METERING

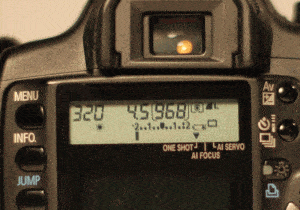
This folks, is your meter.
Your meter can let you know how much light is getting into your camera based on your settings (exposure triangle).
The “0” is supposed to be perfectly exposed. On my Canon, to the left of the 0, your camera is telling you that your picture will be dark, or underexposed and that more light needs to come in. You can achieve this by adjusting any of your settings to make it so.
If the line is to the right, you have too much light and your photo will be overexposed and you then need to adjust your settings to let in less light.
To use your meter, press the shutter button halfway to activate it. If your meter ticker is to the left (ie underexposed) that means you need more light to hit your sensor. To do this you should 1. try opening up up your aperture more( drop it to a lower number)2. slow down your shutter speed, or 3. raise your ISO.
If your meter ticker is to the right( ie overexposed) your can:1. close up your aperture (increase the number), 2. up your shutter speed, or 3. decreased your ISO.
Which setting you change is up to you. That is the beauty of photography.
WHITE BALANCE
White balance is a tricky thing. And therefore I will just cover the basics!
If you look under white balance on your camera, there are several choices. And here is the same photo illustrating them all.
Did you see how a change in white balance changed the photo? Each type of light that you take your photo in will alter your imagine. That is, it will alter the tone or true to life color of your image. Therefore to get the best Straight out of camera photo, you must MUST consider white balance.
I know white balance is my weakest point. So I’ve studied this one over and over again!
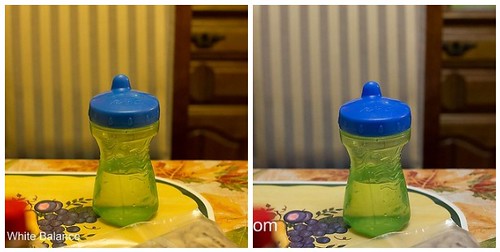
The best way to ensure the correct white balance is to custom white balance. Which is very easy.
This photo was taken in my mother in law’s orange( yes orange) dining room. Notice that the cup has taken on the cast of the room. Then, I did I a custom white balance using a piece of white napkin and YES! Color cast gone, looks natural.
Your camera needs a reference for what colors should look like. Most professionals use a Gray card. But, if you are like me, you don’t have time to constantly carry around a grey card and custom white balance that way. But, you can be creative.
But when all else fails, use automatic white balance.
IT WORKS!
That’s all for white balance and metering.
Next week, we’ll focus on FOCUS man!!

;
;


See now I need to get a camera so I can follow along because I have to actually do it as you are telling it or I will be lost. I am bookmarking the tutorials and I totally blame you if I go and buy a better camera.
Doooo it!!
this completely went over my head, I’m signing up for a photography class soon. Its probably not the best but it’s gotta teach me something 🙂
White balance used to be SOOOOO hard for me, but once you get it, you GET IT. I will never forget a wedding I did it was SUPER sunny outside, you had a bride in a stark white dress IN THE SUN standing next to her groom lol. Custom WB saved my BEHIND lol.
I’m still working on it! For some reason, this is so hard for me to get right straight out of camera! But I’m getting better. Practice practice!
These tips are for newbies? I am a newbie in this are pretty awesome!
Thanks!!