Photography 101: Shoot in Manual Mode
PHOTOGRAPHY 101: SHOOT IN MANUAL MODE
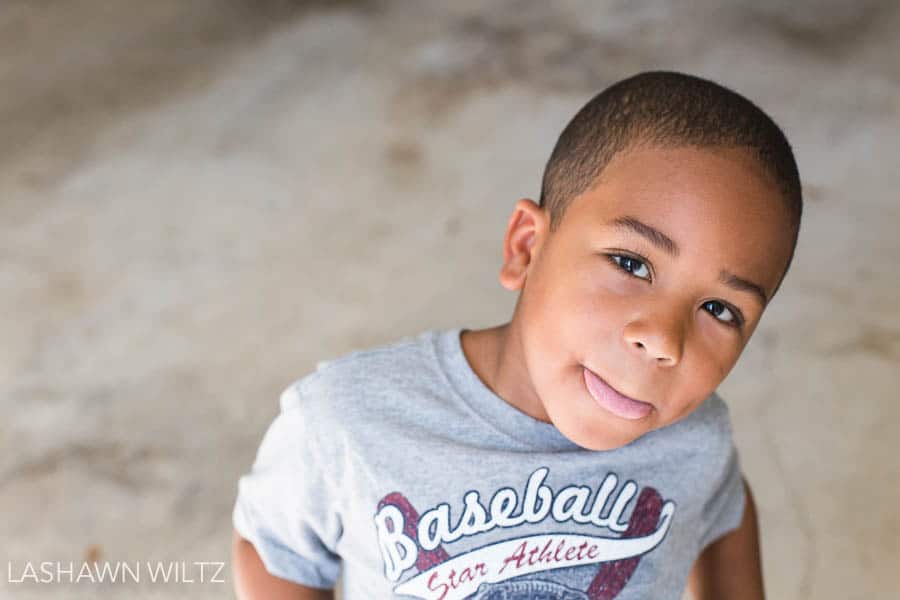
Taken with Canon 6D and Canon 50mm 1.4 lens
Settings: Aperture: f/4.5 Shutter Speed: 1/800 ISO: 1600
We all want to take beautiful photos. it’s why we paid all of that money for that fancy camera. But what is the point of that fancy DSLR or mirrorless camera if you shoot it in auto? Then it’s really just a really expensive point and shoot! One of the best ways to improve your photography, is to shoot in manual mode. When you shoot in automatic, your camera has all of the control. Basically, it is telling YOU the human, what to do. NO. Just No. When you learn to shoot in manual mode, YOU take control of your photos. YOU are finally telling the camera what to do and your photos improve. Now, they won’t improve overnight, just like anything, it takes practice! But before you take your camera off of auto and begin to shoot in manual mode, there are a few things you need to know. Mainly, you need to understand the exposure triangle, what it means, how it works, and how it can help you improve your photography. So this week, we are going to spend time getting to know your camera, getting to know the exposure triangle, and finally, getting your camera off of auto and taking your best photos ever!
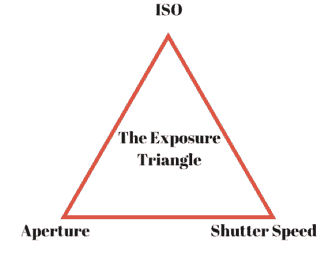
THE EXPOSURE TRIANGLE
The exposure triangle is the term used to describe the relationship between Aperture, Shutter Speed and ISO. The three variables cannot work independently. They work TOGETHER to create a properly exposed image. I want you to understand this basic concept before we go more in depth with each one of the variable in the exposure triangle. So today, I am going to give you a brief overview of the exposure triangle as a whole.
The whole concept behind photography is LIGHT.
To create any kind of photo, you must have light.
BUT it is important to remember that only a certain amount of light is needed to create a photograph. Too much light and your image will be overexposed( too bright). Too little and it will be underexposed( too dark).
APERTURE
Light enters your camera through an opening inside of your camera lens called Aperture. The aperture can open wide open to let in a lot of light or it can open only slightly to let in a small amount of light.
SHUTTER SPEED
When you press the shutter button to take a picture, the aperture only allows the light to enter the camera for a set amount of time. This time is called your Shutter Speed. If you set a slow or long shutter speed, more light goes inside of your camera. If you set a fast or short shutter speed, less light goes into your camera.
ISO
The light that was allowed to enter your camera through the aperture hits the sensor and creates your photograph.
You can decide how sensitive this sensor is to light by adjusting your ISO. If you increase your ISO, your sensor becomes more sensitive to light. Decrease the ISO and the sensor becomes less sensitive to light.
Got it?
All of three of these elements combine to get you a properly exposed image.
All three of these variables can be adjusted to let the right amount of light inside of your camera. So think of it like a basic math equation:
Aperture+shutter speed + ISO= a properly exposed image.
But just like any math equation, anytime you change one part, you have to adjust the others. For example:
You can have 5+3+2=10.
But 6+4+0=10
and 7+1+2 +10.
You an change the variables but you will still get the same sum. It’s the same with your settings. If you change your aperture, you will have to adjust your ISO and/or shutter speed to continue to have a properly exposed photo. And if you changed your ISO, you would have to adjust your shutter speed and/or Aperture to have an exposed photos and if you changed your shutter speed, you would have to adjust your Aperture and/or ISO to have a properly exposed photo.
Get it?
Don’t worry if you don’t quite get it right at this moment! By the end of this week, you will have a clear understanding of all of the parts of the exposure triangle so that you can get off of auto and start to shoot in manual mode with confidence! I can’t wait!
Your homework for today: Find your manual for your camera and make sure you understand how to change all of the different variables of the exposure triangle on your camera. Find out how to change the Shutter Speed, ISO, and Aperture. Knowing is half the battle!
Join me tomorrow for Part 2 when I explain Shutter Speed!


I did get new camera for Christmas. I got a FujiFilm x100t. I am enjoying it as I am learning to use it at its best. Thank for this post. This should help.
I follow you on Facebook too.
Priscilla
instagram: solcookie
flickr: solcookie
As if I couldn’t love you and your blog any more you go and start this great series. I have wanted to shoot in manual for quite some time but never really took the time to play around. Plus as you know it is soooo easy to just leave it in auto and shoot. Now when I get home, I am pulling out my camera and manual so I can become more familiar with the manual settings. Looking forward to the next post!
Thank you so much for this! My camera bag has been growing dusty and this is just the nudge I needed to open it up and reacquaint myself with the manual settings.
I just now discovered your blog and I thank you for the excellent work you have done. You have made it so much easier for me to figure things out!!